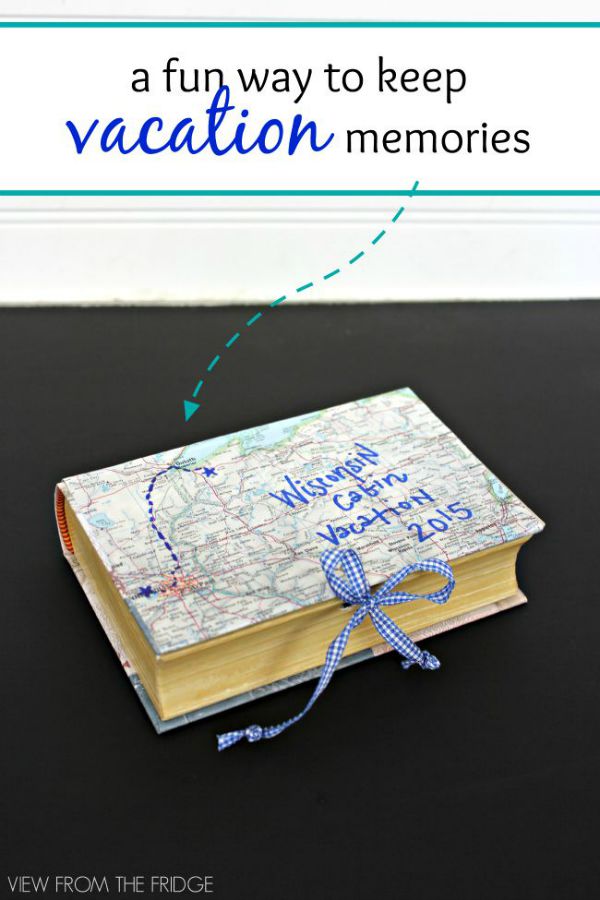
DIY Custom Vacation Memory Box
Make this DIY Custom Vacation Memory Box to store all your mementos of your vacations! This project has THREE things going for it: It’s a fun craft for you and your kids, it’s useful in helping to organize vacation memorabilia, AND it can even serve as bookshelf DECOR after your trip!
Hi there! It’s Katie from View From The Fridge, and today I have a little project that is both fun to create AND useful!! You see, my boys seem to be into hoarding crap stuff lately, and when we go on vacation … these tendencies are in full effect. They collect ‘souvenirs’ all vacation long. Lots of stuff. And since they’re 5 and 3 … it usually involves things like rocks, leaves, shells, sand (which we put in a small jar), random flyers they pick up in hotel lobbies, kids menus they’ve colored while at restaurants, etc.
And while I do think it’s cute that they’re excited about bringing home little mementos of our vacations, clutter makes me anxious. Matt and I are not fans of ‘stuff’ … especially stuff that doesn’t have a place, and so this project was born out of necessity.
It’s a fun project to create because you can customize it however you like. And … it serves an awesome purpose, too; containing all their vacation treasures!
Awhile back, I asked my mom to keep her eyes out for old maps or old atlases at garage sales or thrift stores. It didn’t take her long to find an old Atlas at Goodwill for $1.50. The copyright date on it is 1997, so you may not actually want to use these maps to navigate anymore (we all have smart phones for that now, anyway, right?!?), but I LOVE all the possibilities of craft projects using these maps. There are nearly 200 pages of maps from all over the world in this book!
The atlas, along with this book box that I picked up on 80% off clearance at Michael’s recently (cost me less than $1), were just the things I needed to create a cute (and again … useful) souvenir catcher!

The box’s beach theme was okay (not really our style, but fine). However, we were going on a vacation to a cabin in Northern Wisconsin, so the sand dollars and seahorses didn’t quite fit the feel of our trip . Not to worry, though! Nothing a little paint and Mod Podge can’t fix!
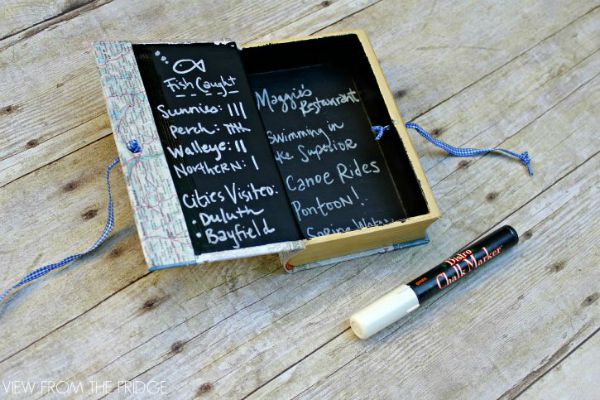
I made this souvenir box before our trip up north. My vision was to put a map of our road trip route on the outside, some chalkboard paint on the inside for the boys (or me since they can’t read quite yet) to jot down notes, memories, etc as we went, and lastly … to find a way to keep the box closed securely.
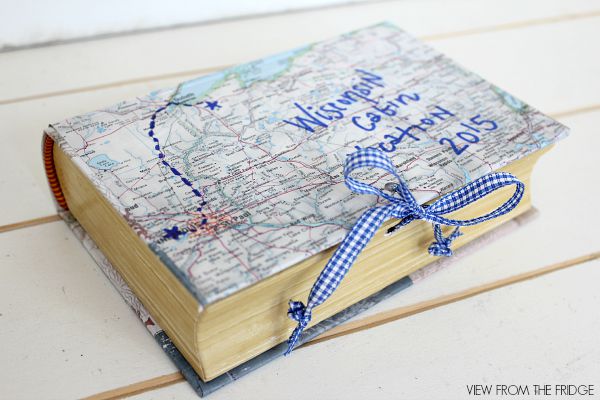
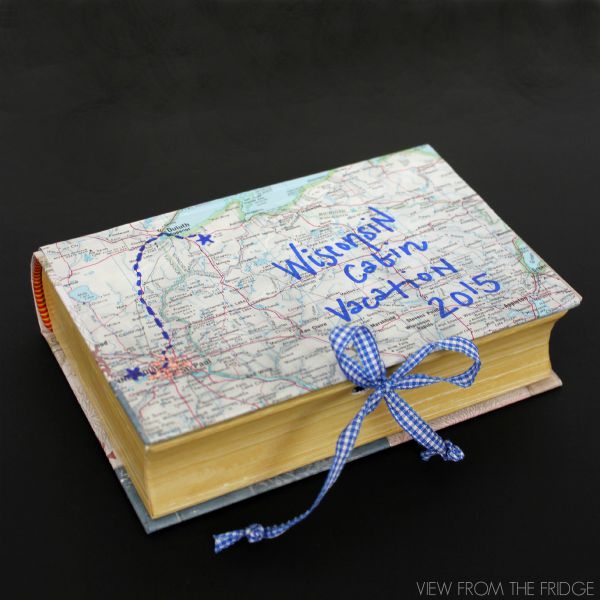
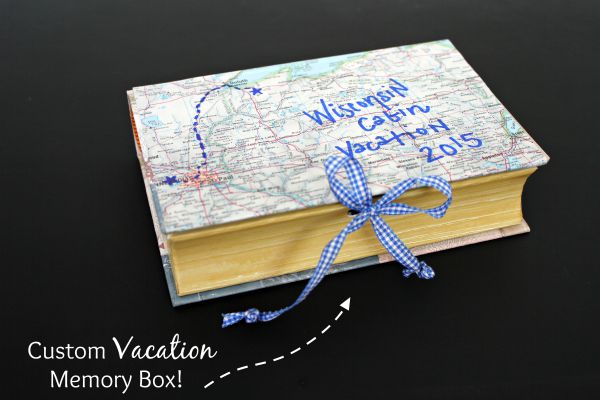
Here’s how it turned out:
and the inside (prior to filling it up with souvenirs):
Memory Box Supplies
Here’s what I used to make our memory box:
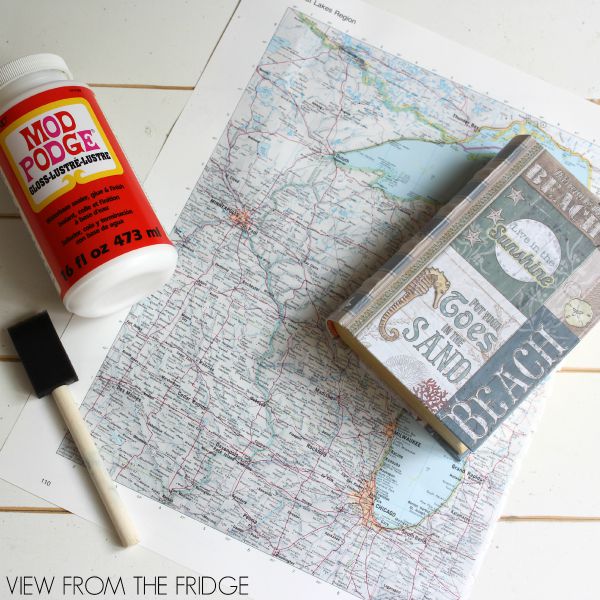
- Map of the route we were taking (Minneapolis – Northern Wisconsin). If you don’t have a random old atlas from Goodwill… try searching for a printable map online to use.
- Mod Podge
- Foam Brush
- Chalkboard Paint (for the inside)
- Drill with ~1/4″ bit
- Ribbon (or yarn, string, twine, etc)
How to Make a Memory Box
And here’s how it came together:

- Trace the top flap of your book box onto the map making sure to include all the areas that you traveled. I actually made my map piece cover the top flap with about an 1″ tucked under the front lip of the flap, the outside binding, and about an inch onto the bottom of the box.
- Cut that piece of map out and set aside.
- Create a place to attach your ribbon (that will hold the box closed). Grab your drill and create one hole in the top flap of your box in the center of the edge that opens. The other hole goes in the front of the box just under the first hole you drilled.
- Using chalkboard paint, I painted the inside of the box. I used two coats … one brushed on with vertical brush strokes, the second with horizontal brush strokes.
- Let the paint dry completely, and now attach your map to the outside. First, set the map in place on the book box and make any necessary folds. Mark on your map where the hole you drilled on the box is. Using a hole punch, create a neat hole in your map that will match the actual hole through the box. You’ll also want to add any labels, trace your route on the map, and add any additional comments or notes (maybe label the binding?). I just used a blue sharpie and let it dry for about 5 minutes before breaking out the Mod Podge. To smoothly adhere the map to your book, first apply a generous layer of Mod Podge to all areas that will be covered using a foam brush. Next, set your map in place, smooth out any wrinkles, and apply another generous coat of Mod Podge over the top of the map. Make sure to get all edges, corners, and the entire surface of the map. I applied a second coat of Mod Podge about 30 minutes after the first, but this is totally optional. It probably would have been just fine with only the first coat.
- Once the Mod Podge is dry, cut two pieces of ribbon ~12-15″ long. Thread one ribbon through each hole. Tie a knot in each end of each ribbon (to avoid loosing the ribbon completely if your kids pull on it). Then simply tie a bow to secure the box closed!
- I used a Chalk Pen to write down memories of the vacation. The chalk pen will erase using a wet paper towel, but just brushing up against it shouldn’t cause the words to come off.
- Let your kids fill with all their mementos throughout the vacation! Rocks, lucky lures or bobbers, fishing licenses, etc. You can add in pictures when you get home, too! I also love the idea of throwing in a small notebook and pencil (or crayons). This way, your kiddos can document the trip as you go … sort of like a vacation journal! If they’re little like mine … have them draw a picture each day of what you did!
Now any time the boys want to talk about or remember our summer vacation, they can simply open the box and comb through all their ‘treasures’, some pictures, and their journal!

I love it when the boys want to ‘relive’ our vacations and trips, and now we have this fun memory box to look through together.
Another great thing about this project, it that the book memory box can actually make great bookshelf DECOR! As you make more (and they have all different sizes of these boxes at craft stores), stack them nicely in your book case to add a bit of personal (and USEFUL!!) style!
Happy vacationing and I hope this little project might solve a similar clutter problem in your house!
More Travel Ideas
- DIY Travel Kits for Kids
- Road Trip Printables for Kids
- Travel Activities for Kids perfect for Car or Plane
Oh my gosh, this is so cute & a great idea!
I love this idea, I love the map theme and I love that it is a personal keepsake. Thanks for sharing
How clever! I love the personalized map. Thank you for the idea! #inspiration (2)
Thanks!! My boys loved the project! Thanks for stopping by!!
Thanks for the info!
What a cute idea! I just love this – it will be awesome for after my honeymoon! We’re getting married in October so I’m totally pinning this to remember it for when we get back from our Prince Edward Island honeymoon!